Introduction
SAP PI/PO is a widely used middleware platform that connects SAP and non-SAP systems. However, SAP announced that it will no longer support SAP PI/PO after 2027 and advised customers to migrate to SAP Integration Suite (SAP CPI). There are several things to consider when considering data migration from SAP PI/PO to SAP CPI. First, you need to assess your current integration environment and determine which integrations need to be migrated. Once you have identified the integrations to be migrated, you need to plan the migration process. This includes creating a migration schedule, identifying needed resources, and creating a migration plan. There are several tools and resources available to help you migrate data from SAP PI/PO to SAP CPI.
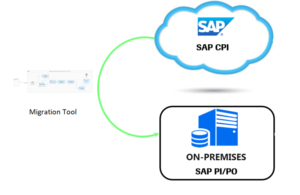
SAP provides the Migration Cockpit tool that allows you to identify and migrate integrations. There are also a number of third-party tools and consultants available to assist you in the migration process. The transfer process can be difficult, but it is important to plan and execute the transfer carefully to make it successful. Migration Tooling is a SAP Cloud Integration feature that enables you to migrate integration artifacts from SAP Process Orchestration to SAP Integration Suite. A migration assessment helps you estimate the technical effort of the migration process and assess how different integration scenarios can be migrated. Extract data from an existing SAP Process Orchestration 7.5 system.
Benefits of transferring data from SAP PI/PO to SAP CPI:
- Better performance and scalability
- Reduced costs
- Access to new features
- Increased flexibility
- Better security
Challenges involved in migrating data from SAP PI/PO to SAP CPI:
- The complexity of the transfer process
- The need to train staff for the new platform
- Possibility of data loss or corruption.
Guide to Establish Connection between SAP PI/PO to Migration Tool:
Create a connection between your SAP Process Orchestration system and Migration Assessment to process data from your system at later stages.
Pre-Requisite
- You have enabled the Migration Assessment feature in the SAP BTP console as described in Feature Activation and Administration.
- You have assigned the necessary access rights for you and your users as described in the Assign access rights section.
Since API endpoints and sub paths are used to extract data from your SAP process orchestration system, ensure that the SAP Destination service can access the endpoints listed below.
Directory Content
- /CommunicationChannelInService
- /IntegratedConfigurationInService
- /SenderAgreementInService
- /ValueMappingInService
- /ConfigurationScenarioInService
ESR Content
- /rep/read/ext
- /dir/read/ext
Message Monitoring
- /rep/query/
The endpoints are constructed according in the pattern <protocol>://<hostname>:<port><endpoint>. You can use the cloud interface to securely display these endpoints.
Cloud Connection Configuration
In Cloud Connector, Add your SAP BTP subaccount by providing the subaccount Id, User Id, password as shown.
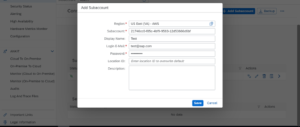
Make sure the cloud connector is connected. Create a new HTTP destination (cloud to local) with backend type SAP process integration by adding Host and Port address.
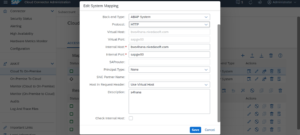
To connect the SAP process management system to the migration assessment application, do the following Procedure:
- Open the settings in the Transition Assessment application. Select SAP Process Orchestration Systems named Add from the table. Enter a system name and description. Enter the information about integrated folders:
- Enter a URL as the address.
- Enter the user ID of the technical user of the SAP process management system.
- The user must be assign the following roles in the SAP process management system:
-
- SAP_XI_API_DISPLAY_J2EE
- SAP_XI_API_DEVELOPY_J2EE
- SAP_XI_MONIOR_J2EE
- Enter the user and Password. Select the box as in the integration catalog.
- Select Create.
The new system is now listed in the SAP process management systems. If you want to check if the connection is working properly, select the system and select test connection. In the current measure, transfer is only supported for ICOs with statuses of Adjust Need and Ready for Transfer.
Note:- Before using the migration tool, it must be activated in the SAP BTP console and users must be given the appropriate access rights.
Manually migrating integration scenarios from SAP Process Orchestration to SAP Integration Suite can be an error-prone process and requires significant human investment. SAP Process Orchestration customers have made significant investments for many years, and to take advantage of all the new innovations in SAP Integration Suite, we had to deliver a migration tool that helps automate this process as much as possible.
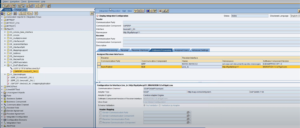
The migration tool automatically creates connections to SAP Cloud Integration based on project-time artifacts from SAP Process Orchestration based on the current scenarios supported by the model-driven process. In cases where artifacts meet supported scenarios, much of the migration can be automated, and some manual changes may still be necessary. Ultimately, the migration tool aims to achieve around 60-70% migration time savings through automation. The integration scenarios of the SAP Process Orchestration system correspond to the integration scenario models. Each model is analyzed and compared to scenario models provided as part of the Cloud Integration Migration Tool. Each Migration Integration Configuration Object (ICO) has an associated template in the migration tool.
Based on the information provided in our templates; the migration tool can create the corresponding integration flows in SAP Integration Suite:
Step 1: Open the SAP Integration Suite Launchpad, go to the Integration Design workspace and create or open any existing integration package.
Step 2: Change the integration package. A migrate button is then visible to move the integration scenarios from SAP Process Orchestration to SAP Integration Suite.
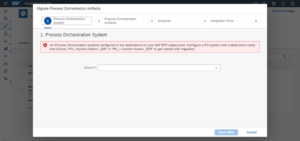
Step 3: Click the “Migrate” button and the migration tool will appear to guide the scenario migration. First select SAP Process Orchestration System.
Step 4: Select the SAP process management system and create a connection. Listed here are the SAP process orchestration systems that were added as part of the SAP process orchestration system add-on.
Step 5: Click “Connect” to connect. If the connection is successfully established, the “Next step” button is enabled in the footer.
Step 6: Select the migration ICO from the SAP Process Orchestration Artifacts tab. You can see that all ICOs are downloaded from the SAP Process Orchestration integration system folder. The “Type” selected is “Integration Configuration Object”, which is the only SAP Process Orchestration object supported by this version of the migration tool.
Step 7: Filter ICOs according to available parameters. In general, the list of ICOs is huge, so it is recommended to use a filter. In this example, ICOs are filtered using the “Sender Communication Component” parameter. Once the ICO is selected for transfer, click Next Step.
Step 8: ICO related templates can be selected from the drop down list. You can choose a model migration scenario. A context-sensitive help link is available to learn more about the template and the resulting integration flow template after migration.
Step 9: In the Integration Flow tab, enter a relevant integration flow name and ID and click Preview. The description field is automatically populated with the SAP Process Orchestration system name, scenario type and name, and model information for later use.
Step 10: On the Control tab, click the “Move” button. Please check the details before proceeding.
Step 11: When an integration scenario is successfully migrated from SAP Process Orchestration to SAP Integration Suite, an integration flow is created in the list of artifacts on the package overview page.
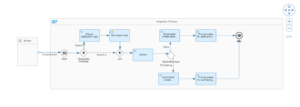
Step 12: Open the expected integration flow that will be created after a successful migration. This example creates a point-to-point integration flow using a SOAP adapter, two message descriptors, and one XSLT descriptor.
Step 13: Certain configuration changes are required to enable the integration flow. For example, set the proxy to “On-Premise” in the receiver SOAP adapter and provide the associated “Location ID”.
Step 14: Select the XSLT mapping step and open the corresponding resource for validation. You can also see resources for message mapping steps.
Step 15: Enable the integration flow and start the endpoints to process the messages normally. Verify that the security artifacts used in your ICO, such as the credential name and key alias, are correctly defined in the integration flow. Deploy the required security artifacts before deploying the integration process.
Conclusion
All in all, transferring data from SAP PI/PO to SAP CPI can be a challenging but rewarding process. By carefully planning and executing the migration, you can ensure that your organization benefits from the many benefits that SAP CPI offers.
To read more of our blogs you can surely click here.

I believe this is one of the most vital information for me.
And i’m happy reading your article. However should commentary
on some normal things, The web site style is perfect,
the articles is in reality nice : D. Good task, cheers