SAP SAC integration with SAP BW/4HANA
By Trijotech Team/ December 2022Introduction
Welcome to our blog, where we will delve into the exciting world of integrating SAP SAC (Analytics Cloud) with other SAP products, focusing specifically on establishing a connection between SAP SAC and SAP Business Warehouse (BW). As organizations continue to leverage the power of data analytics to drive business success, the seamless integration between SAC and BW offers a dynamic and comprehensive solution for accessing, analyzing, and visualizing data stored in BW. Join us as we explore the step-by-step process of configuring this integration, unlocking the potential for enhanced reporting, real-time insights, and informed decision-making across your SAP landscape.
2 Types of connection:
Import: When there is a need to bring data from BW into SAP SAC for further analysis, modeling, and visualization, an import connection between SAP SAC and BW is necessary. Below we will explore the step-by-step process of configuring an import connection and setting it up in SAP SAC.
Live: A live connection between SAP SAC and BW is preferred when real-time access to BW data is critical for decision-making. Below we will explore the step-by-step process of configuring a live connection and setting it up in SAP SAC.
Configuration of Import Connection between SAP SAC and BW/4HANA:
To configure the data source in SAP SAC, follow these simple steps:
1. First, navigate to the “system” tab in the administration section. Next, click on the “data source configuration” tab, where you will encounter a variety of data sources to choose from. Scroll down until you find the SAP BTP core account option. Take note of the region host and sub-account user details displayed there, as they will be essential for the next step.

2. To establish a secure connection between your on-premises application and the cloud, a cloud connector is essential. This crucial tool acts as a handshaking application, facilitating a seamless link between the two environments. Before proceeding with the installation of the cloud connector, ensure that you have a SAP JVM ready. Locate or download the SAP JVM and make note of its file path, as you will need to specify this during the installation process.
3. Once you have the SAP JVM, extract it onto the server where you plan to install the Cloud Connector. As an example, you can unzip the file into the directory C:\SAP JVM\sapjvm_8. You can download it from this link: https://tools.hana.ondemand.com/#cloud
4. After obtaining the SAP JVM from the provided link, download the cloud connector from the same source. During installation, specify the folder location of the SAP JVM.

5. Once the installation process is complete, open your web browser and enter the following URL: https://localhost:8443. This will take you to the logon screen. Here, use the default credentials: “Administrator” for the username and “manage” for the password. It is recommended to change the password after your initial logon. At this point, you will be prompted to choose between a master and shadow installation. Opt for the “Master” option if you are installing a single Cloud Connector instance or the primary instance from a pair of Cloud Connector instances.

6. Next, enter the subaccount details that you noted earlier. Specify proxy host and port if using a proxy, otherwise leave blank. Optional to enter Location ID for multiple Cloud Connectors. Remember to save the configuration.

7. Once you have completed the necessary configuration, click on the “Connect” button. After doing so, verify that the connector state is displayed as “Connected.” This confirmation ensures that the Cloud Connector has been successfully established.

8. When establishing connections with SAP BPC MS, SAP BW, SAP UNX, or SAP ERP systems, it is necessary to install the SAP Analytics Cloud agent in addition to configuring the Cloud Connector. However, for connections with SAP BPC NW, SAP BPC for BW/4HANA, OData, or SAP S/4HANA, configuring the Cloud Connector alone is sufficient.
9. To proceed with the installation of the SAP Analytics Cloud Agent, there is a preliminary step to follow. It involves downloading Apache Tomcat, a widely used web server and servlet container, from the official website at https://tomcat.apache.org/download-80.cgi. Once the download is complete, simply double click on the Tomcat executable file to initiate the installation procedure. During this step, you will be prompted to accept the license agreement, an important formality. Moving forward, when presented with the Choose Components screen, it is recommended to stick with the default options, which are already configured optimally. And click next.

10. You need to specify the ports to be used by Apache Tomcat. It is essential to ensure that there are no conflicts with existing applications already running on your system.

11. Next, specify the path to your and install.
12. Once you have successfully installed Apache Tomcat, the next vital step in optimizing the performance of SAP Analytics Cloud Agent is to configure the JAVA Heap space allocation. Launching the Tomcat configuration allows you to modify these settings and allocate more memory accordingly. To initiate the configuration process, navigate to the Tomcat installation directory and locate the Tomcat8w.exe file. Simply double click on it to open the configuration window. By default, the initial and maximum heap space values (-Xms and -Xmx) are usually set to 128MB and 256MB respectively, which often prove insufficient for efficient data acquisition in SAC, leading to timeout errors. It is crucial to increase these values to prevent such issues. For enhanced performance, it is recommended to set the values to 1024MB and 2048MB respectively.

13. To install the SAP SAC (Analytics Cloud) agent, begin by downloading it from the SAP Support Portal: https://support.sap.com/swdc. Access the SAP Software Downloads page and navigate to “By Category.” Choose “SAP Cloud Solutions” and then select “SAP ANALYTICS CLOUD CONN SAP ANALYTICS CLOUD CONN 1.0 SAP ANALYTICS CLOUD AGENT 1.0.” Proceed to download the latest version available.

14. Once downloaded, unzip the file and rename the WAR file to C4A_AGENT.war. Extract the package and copy the C4A_AGENT.war file to the webapps directory in your Tomcat installation. When you restart Tomcat, the agent will automatically deploy.

15. To establish the authentication credentials needed for configuring the SAC Agent, follow these steps. First, locate the Tomcat conf directory and open the tomcat-users.xml file. Inside this file, you can add a new user with the Services role. This user will have the necessary permissions to ensure smooth communication between SAP Analytics Cloud and the SAC Agent. Simply provide a unique username and password for the new user and make sure to save the changes.

16. For establishing a connection with SAP BW, an additional component called the SAP JCO connector is required. To obtain it, you can download the connector from the official SAP website at http://support.sap.com/swdc. Once the download is complete, extract the contents of the downloaded zip file. Within the extracted files, locate the sapjco3.dll and sapjco3.jar files. Copy these two files and paste them into the tomcat/lib directory. After completing the file transfer, it is essential to restart the Tomcat application for the changes to take effect.
17. Now go to your cloud connector at http://localhost:8443. Enter your login credentials to access the Cloud Connector administration console. Once logged in, select the “Cloud To On-Premise” option. Next, locate the “+” icon and click on it to add a new Access Control entry. This step is crucial for defining the access permissions for on-premises systems.

18. The next step is to specify the Back-end Type. Select “Other SAP System” as the Back-end Type from the available options.
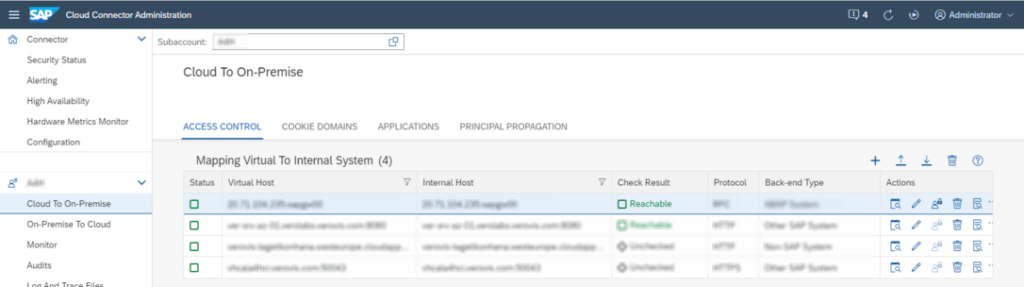
19. Then select HTTP protocol. Choose HTTPS if SSL configured on the Tomcat instance where the BOC Agent is deployed.

20. enter the hostname (Internal Host) and port number (Internal Port) of the Tomcat server where the SAC Agent is running. The default HTTP port for Tomcat is 8080, while the default HTTPS port is 8443. Therefore, when specifying the Internal Host, provide the hostname or IP address of the Tomcat server. For the Internal Port, enter the corresponding port number based on whether you are using HTTP or HTTPS (8080 for HTTP or 8443 for HTTPS).

21. Now give a virtual host and port that will be used on SAC side.

22. Select “None” as the Principal Type. This selection indicates that there is no specific principle or user identity associated with the access control settings. By choosing “None,” you are specifying that the access control applies to all users or principals attempting to access the specified resources. This can be useful in scenarios where you want to grant general access to the SAP SAC Agent without requiring specific user authentication or identity verification. However, please note that depending on your specific security requirements, you may need to consider alternative options or additional authentication mechanisms to ensure secure access to the SAC Agent.

23. Select the option “Check availability of internal host” to ensure the HANA Cloud. Connector can access the C4A Agent and click finish.

24.The next step is to add a resource in the Cloud Connector configuration. Set the URL PATH to “/C4A_AGENT/” and choose the option “Path and all sub-paths” to allow access to this specific path and its sub-paths. This URL PATH represents the endpoint or route where the SAC Agent is accessible within the Tomcat server. By adding this resource and specifying the URL PATH, you are granting the necessary permissions for SAP SAC (Analytics Cloud) to communicate with the SAC Agent and retrieve the required data. Once the URL PATH and access settings are configured, click on the “Save” button to save the resource configuration.

Creating an import connection in SAC:
Follow these simple steps within your SAC tenant. Firstly, navigate to the administration section and access the data configuration tab. Here, you can establish a connection to your on-premises data sources by adding a new location. Enter the required information to create the connection. Specify the Host as the virtual hostname that you previously defined during the HANA Cloud Connector configuration. Next, input the virtual port that you set during the HANA Cloud Connector configuration in the Port field. In the Username and Password fields, enter the credentials that were specified in the tomcat-users.xml file. These credentials ensure secure authentication for the connection between SAC and your on-premises data sources. Once you have entered all the necessary information, simply click on the Create button. This will establish the connection, allowing you to access and analyze your on-premises data.
Configuration of Live Connection between SAP SAC and BW/4HANA:
Live Data Connection to SAP BW Using a Direct CORS Connection via Unified Connectivity.
1. To get started, the first important task is to enable InA (Information Access) on your ABAP Application Server. InA serves as a REST HTTP-based protocol that allows SAC to query your data sources in real time. Ensuring that your InA package is enabled and the associated services are up and running on the ABAP AS for your data source is crucial. To check this, simply open your browser and navigate to “https://<Your_ABAP_Server>/sap/bw/ina/GetServerInfo?sap-client=<Your_Client_ID>”. By verifying the accessibility of this URL, you can confirm the availability and functionality of the InA services.
2. Ensure that the necessary Information Access Services are active in your SAP BW/4HANA or SAP BW system. To do this, access your system using SAP Logon and enter the transaction code “SICF”. In the Service Path field, input “/sap/bw/ina” and click on Execute. In the Virtual Hosts/Services section, navigate to “default_host -> sap -> bw -> ina”. Here, it is crucial to confirm that the following services are active: BatchProcessing, GetCatalog, GetResponse, GetServerInfo, Logoff, and ValueHelp.

3. The next step is to configure Cross-Origin Resource Sharing (CORS) on your ABAP Application Server. CORS enables the secure access of live data in SAC. You can enable CORS in your system parameters without having to restart the ABAP AS. To proceed, access your SAP BW/4HANA or SAP BW system using SAP Logon and enter the transaction code “RZ11”. Then, input the parameter “icf/cors_enabled” and click on Display. Then, select Changes Value and set the New Value to 1. Finally, save the changes.

4. After successfully configuring CORS (Cross-Origin Resource Sharing) on your ABAP Application Server, the next important step in establishing a live connection between SAP Analytics Cloud (SAC) and SAP BW is to permanently enable CORS in your system parameters. To do this, access transaction code “RZ10” and select the appropriate Profile. If you have multiple authentication methods configured on your ABAP system, choose “DEFAULT” from the list. Then, select Extended Maintenance and click on change.

5. Now click on Parameter Create. Set the parameter name as “icf/cors_enabled” and set its value to “1.” Save the changes by clicking Exit and then Yes. Next, click on Profile and select Save, followed by clicking Yes to activate the profile. Continue by clicking Yes, and then exit the system, logging off when prompted. To ensure the changes take effect, it is essential to restart the ABAP AS.
6. The next crucial step involves adding SAP Analytics Cloud to the HTTP whitelist. Access the transaction code “/NUCONCOCKPIT” to begin. Change the Scenario to the HTTP whitelist Scenario and ensure that the Mode of Cross-origin Resource Sharing is set to Active Check. Double-click on Cross-origin Resource Sharing and select Display/Change. For SAP BW, choose “Add” under whitelist, while for SAP BW/4HANA, select “To whitelist.” Add necessary information in the Input Window. Specify the Service Path as “/sap/bw/ina” and add your SAP Analytics Cloud host in the Host rule, such as “mytenant.us1.sapbusinessobjects.cloud.” In the Allowed Methods section, select GET, HEAD, POST, and OPTIONS. Ensure that the following headers are added to Allowed Headers: x-csrf-token, x-sap-cid, authorization, mysapsso2, x-request-with, sap-rewriteurl, sap-url-session-id, content-type, and accept-language. Similarly, include the following headers in Exposed Headers: x-csrf-token, sap-rewriteurl, sap-url-session-id, sap-perf-fesrec, and sap-system. Finally, make sure to select Allow Credentials for a secure connection. Save your changes.

7. When setting up SAML 2.0 Single Sign-On (SSO) for SAP Analytics Cloud and your data source
system with the same Identity Provider, it is necessary to add a dummy HTML file to your
ABAP Application Server. This step enables user authentication and ensures smooth navigation
through SAML HTTP redirects. If you are using Username and Password or None authentication
methods, you can skip this point. To proceed, access transaction code “SE24” and enter the
Object Type as “ZCL_DUMMYAUTH_SERVICE.” Select Create and then Save. Move to the Interfaces
tab and add “IF_HTTP_EXTENSION” along with a relevant description. Next, navigate to the
Methods tab and include the method IF_HTTP_EXTENSION~HANDLE_REQUEST. Double click on
IF_HTTP_EXTENSION~HANDLE_REQUEST and add the following code:
          method IF_HTTP_EXTENSION~HANDLE_REQUEST.

          html_content TYPE string.

          html_content = ‘<html><script type=”text/javascript”>window.close();</script></html>’.

          server->response->set_header_field( name = ‘Cache-Control’ value = ‘no-cache,no-store’).

          server->response->set_cdata( data = html_content ).

          endmethod


Select Save for the changes made in the previous step and then click on Activate to enable the functionality. Now, access transaction code “SICF” and enter the Service Path as “/sap/bw/ina,” then press Enter. Under “default_host -> sap -> bw,” right-click on “ina” and choose New Sub-Element. In the Service Name field, enter “auth” and select Input. Open the Handler List tab and enter “ZCL_DUMMYAUTH_SERVICE” as the handler. Finally, save the configuration.


8. The final step involves configuring your web browsers. Begin by clicking on the Settings option located at the top-right corner of your Google Chrome browser. From there, navigate to Privacy and security and select Site Settings, followed by Pop-ups and redirects. In the Allow section, add the relevant domains for your SAP Analytics Cloud tenant, including:
[*.] sapanalytics.cloud
[*.] hanacloudservices.cloud.sap
[*.] hcs.cloud.sap
[*.] analytics.sapcloud.cn
Return to Privacy and security and click on Cookies and other site data. Under Sites that can always use cookies, add your ABAP AS domain. This ensures smooth and uninterrupted data access and improves the overall browsing experience while working with SAP Analytics Cloud.
Creating a live connection in SAC
Firstly, navigate to the Connections section in the side menu and click on “Add Connection”. A dialog titled “Select a data source” will appear. Expand the “Connect to Live Data” option and choose “SAP BW”. In the dialog, provide a name and description for your connection. Keep in mind that the connection name cannot be modified later. Set the connection type to “Direct” and enter the host name, HTTPS port, and Client for your data source. Next, select the appropriate authentication method from the options provided: “None” for SSO systems not based on SAML 2.0, “Username and Password” for entering credentials manually, or “SAML Single Sign-On” if you have completed the necessary SSO prerequisites. Finally, click “OK” to create your live data connection. Congratulations! You can now proceed to test the connection on a model and explore the benefits of real-time data analysis and visualization.
Conclusion
SAP Analytics Cloud integration with other SAP products provides numerous benefits, including real-time data access, reduced errors, better decision-making, and improved efficiency. Import is suitable when the data in BW needs to be transformed, aggregated, or combined with other data sources within SAP SAC. The import connection allows for flexibility in data preparation and modeling, enabling users to create tailored dashboards and reports based on the imported data. It is beneficial when users require the ability to work with a subset of data or when there is a need to incorporate data from other sources alongside BW data.
A live connection is suitable when immediate insights and analysis of real-time data are required, such as in scenarios where frequent data updates or operational monitoring is essential. It ensures that the data accessed in SAP SAC is always up to date and reflects any changes made in the underlying BW system. Ultimately, the choice between an import connection and a live connection depends on the specific requirements of the analysis, the need for data transformation or real-time access, and the desired level of flexibility in modeling and visualization.
To read more of our blogs you can surely click here.
Check out other video blogs.
Disclaimer: All the opinions are solely for information purposes, and the author doesn’t recommend or reject any tools. It should be done after your own due diligence.